And there was me seeing if I could go a year without blog posts! Hi there knitting blog, I have missed you, honestly. How've you been? The place looks lovely. I have had such a year for knitting too -- eight projects to show you! Eight! And the year's not over yet. Watch this space.
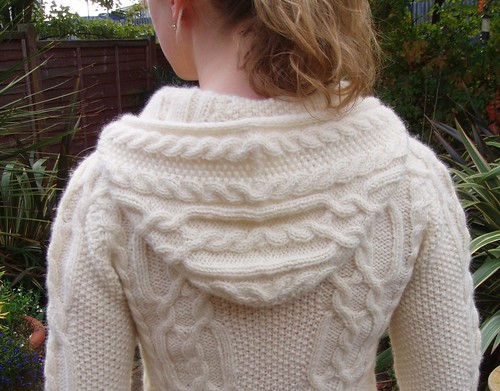
The pressing concern which has brought me out of blogging retirement today is the need for somewhere with a little more space to write than a Ravelry project page, so I could keep a note of something. One of my biggest achievements this year has been completing the utterly sumptious Vivian, by Ysolda. And one of my biggest achievements within that project has been altering the way the hood is constructed (after knitting that damn hood not once, not twice, but three times). The first couple of times I just added extra length to the hood (18 rows the first time, and 30 rows the second) but I didn't like the way the hood hung as a result -- it was too long and scoopy and didn't look as polished as the rest of the garment. So I went back to the drawing board and came up with something I liked better, and wanted to share how I did it with the rest of the world in case it helps somebody else.
(Other big thing done while completing Vivian -- cutting my knitting. More on that another time, but do know that when the scissors had made the cut which put me beyond the point of no return I did actually break out into a cold sweat. Horrible, but worth it.)
So anyway, Vivian hood. These are my instructions for making the hood larger and with a more rounded approach to shaping the crown, in the 34-inch size. All of the increases and decreases are contained within the seed stitch panel, which lets the gorgeous cable pattern on either side of the hood continue uninterrupted all the way to the top. For the very top of the hood (the parts I've called 'crown panel' sections) I've used Ysolda's approach to the saddle shoulders, which is very pleasing and works neatly. (These instructions are really specific to the 34-inch size but you could apply the process to all the other sizes -- increase and decrease in the seed stitch panel, and then when the top of the seed stitch panel is at the length you want the hood to be and the right width, work either side of the crown using Ysolda's saddle shoulder approach for the appropriate number of pattern rows. If that makes no sense and you're desperate, you could ask me!)
I've put the hood row numbers and the pattern row numbers, as I found distinguishing between the two a bit confusing.
(This is a personal alteration to the pattern and isn't a criticism of it -- aside from the hood this has been one of the best and most satisfying patterns I've ever followed. If anything my interpretation of the hood is inspired by how awesome the rest of the pattern is. And hopefully one day soon [by my interpretation of 'soon'] you can see photos of my finished project!)
Felinity's Vivian hood
Begin the hood as set in pattern.
Rows 1-14 (20-33 in pattern) - Work straight in pattern.
Rows 15-51 (34-70 in pattern) - Increase 14 stitches in seed stitch panel as follows: increase 1 stitch at either end of seed stitch panel (pfb) on rows: 15 (34 in pattern), 21 (40), 27 (46), 33 (52), 39 (58), 45 (64), 51 (70) - 22 stitches in seed stitch panel
Rows 52-64 (71-83 in pattern) - Work straight in pattern
Rows 65-81 (84-100 in pattern) - Decrease 10 stitches in seed stitch panel as follows: decrease 1 stitch at either end of seed stitch panel on rows: 65 (84 in pattern), 69 (88), 73 (92), 77 (96), 81 (100) - 12 stitches in seed stitch panel
Start crown panel section.
Lefthand crown panel (6 rows)
Row 82 (101 in pattern) (WS) - Work in pattern until one stitch before seed stitch panel begins, p3tog, turn
Row 83 (102) (RS) - Sl1, work in pattern to end of row
Rows 84-87 (103-106) - Repeat Rows 82-83 twice. Break yarn leaving a long tail. Put the 41 stitches just worked on a stitch holder.
Righthand crown panel (6 rows)
Row 82 (101 in pattern) (WS) - Join yarn and start row after seed stitch panel. Sl1, work in pattern to end of row.
Row 83 (102) (RS) - Work in pattern until one stitch before seed stitch panel begins, sssk, turn
Row 84 (103) - Sl1, work in pattern to end of row.
Row 85 (104) - Repeat row 102.
Rows 86-87 (105-106) - Repeat rows 84-85 once. Break yarn.
All seed stitch panel stitches should now have been worked. Put the stitches from the lefthand crown panel back on a separate needle. Kitchener the two crown panels together from the outside in. (Note: it's worth putting the effort in to graft the panels together appropriately depending on whether it's knit or purl. For my first two versions of the hood I did a three-needle bind-off after grafting the i-cord section, which was easy but doesn't look nearly as nice. Grafting knit/purl will still be half a stitch out, but even so looks much more attractive.)
Labels: vivian